Showing posts with label projects. Show all posts

Monday, 7 May 2012

3D printing jewellery with Shapeways: Two months in.

It's been two months since I started playing around with Autodesk 123D and Shapeways, so here's the second report of what I've managed over the past month.

CharGyse 3D Printed Designs - Find these and more at www.shapeways.com/shops/chargyse

My first shipment of items arrived from Shapeways about a week later than it would normally take (production of sterling silver pieces was behind schedule on their end). I've been waiting to post this update so that I could include the photos of them.

Photos of the earrings and pendants
These are the photos I took only minutes after unpacking them from the box. I have updated the shop images with close ups, so you can follow this link to the [SHOP] if you want to see the close ups of them all.

Earring pendants in Sterling Silver

Earring pendants in "Frosted Ultra Detail"

You can find these earring pendants in the Earrings section of the shop.

Necklace pendants in Sterling Silver

Necklace pendants in "Frosted Ultra Detail"

You can find these necklace pendants in the Pendants section of the shop.

Bangles to go with each set
I got the bangles done on time, doing two different designs; the second more dainty than the first.

The "SevenBangle" style - one bangle, but with seven pretty sides to it

The "DiAngled" bangle - shaped like two bands attached to each other at an angle

You can find these in the Bangles section of the shop.

Blender renders for a quick preview of the pieces
I did a little searching around and found a video tutorial on how to make a golden material in Blender. They've disabled embedding by request, but the link is here: Realistic Gold Material Tutorial Blender 2.62 (Cycles) 

I followed the video but changed the colour I used so that it would look less like gold and more like a silver material. Here are some quick screenshots I took of some stuff:


Oh yeah - I also modelled a little something up for the Shapeways "Flextest" challenge

After the first shipment arrived though, I realised that I would need to change the Blender material textures. I remember seeing a "Brushed Steel" texture tutorial somewhere, which could be handy in achieving the layered look of the silver pieces - if I can find it again.


COMING SOON:-

Beads
I have managed to get the beads modelled up - but I've yet to upload them to the Shapeways site.


Rings
I haven't managed to do the rings yet, but I have decided how I'm going to do them. The ring band will be based on the DiAngled bangle style (the dainty, minimalist, second style above).

A new collection of designs - in "Stainless Steel"
Looks like the series based on Fibonacci numbers is going to go on hold for a while. Instead, I will be working on "Stainless Steel" versions of everything I have done so far, which should work out cheaper than Sterling Silver. Good for those who want a metal pendant, but at lower prices.

Marketing and Selling Stuff
Now that these are things that exist, I have to get them noticed out in the wider world with marketing materials and stuff.

Monday, 2 April 2012

3D printing jewellery with Shapeways: One month in.

I've been playing around with the Autodesk 123D Beta and Shapeways for just over a month now, so I wanted to write a little report of what I've managed over the past month.

Tumblr


I've created a tumblr blog especially for images of the growing mountain of jewellery that will be generated over time by me. Follow it and eventually you will see photographs of the pieces up there as well as the computer generated renders of the designs before they have been printed.

Pendants


I've designed, modelled in CAD software and uploaded nine designs for pendants, and each has been listed publicly and are available for sale in both sterling silver and a translucent plastic known on the Shapeways site as "Frosted Ultra Detail".

Click Pendants to see them all.

Earrings


I've modelled matching pairs of earrings for each of the nine pendant designs, again in sterling silver and Frosted Ultra Detail.

Click Earrings to see them all.

Cuff-links


I've also designed and modelled the matching pairs of cuff-links for each of the nine pendant designs, available only in sterling silver, and a glossier sterling silver for a little extra [the cuff-links are polished/buffed before they are sent to you].

Click Cuff-links to see them all.


COMING SOON:-

Photos of the earrings and pendants

Yesterday I put through an order for all of the earrings and pendants designed so far. They should be shipped by April 18th at the latest so I should have them ready for photos by the end of next month. I've been looking at potential models and photographers for a shoot, but nothing has been decided just yet...

Bangles to go with each set

My "homework" for the next week is to get ready the matching set of bangles for sale - that's designed, modelled AND uploaded. Thankfully, my experience with the software I'm using has grown a lot over the past month and I'm now able to complete such tasks a lot more quickly and efficiently than I could in the beginning.

Charm Beads

I've been looking into creating the designs on a much smaller scale for charm beads, potentially in the threaded charm bead style or the Italian charm bead style... We'll see how it goes over the next month.

Rings

To complete the collection of each design, I will be working on ring versions for each design this month. I have no idea how I want to do it yet, but I intend to make them fit in with the rest of the collection in sterling silver and possibly Frosted Ultra Detail. We shall see.

A new collection of designs

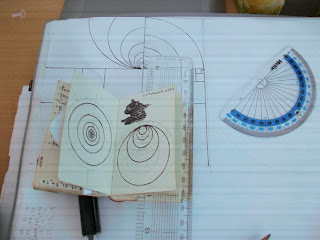
We've been having lovely weather in Cardiff over the past week, and all that nice weather made me ditch my laptop for the little 2 by 3 inch notebook I made a while back. I had to make sure I was doing some kind of work while I enjoyed the nice weather during my self-enforced work hours, and ended up drawing up some nice designs based on circles and Fibonacci numbers. Keep an eye out for those in the next couple of months. Here's a sneaky peek:


I'm really looking forward to next month!

Tuesday, 13 March 2012

My First Nine Designs for 3D Printed Jewellery

17 days after checking out Shapeways, I've got a collection of 9 designs uploaded:


Each charm is available in Silver, Glossy Silver or a plastic material they have called "Frosted Ultra Detail".

They are available for sale separately, so you can buy one on its own to hang and wear as a necklace, or buy multiples to hang from your own earring hooks or string together to wear as a bracelet.

Fancy yourself a bit of a fashion or jewellery designer? Buy a variety of them and incorporate them into your designs, mixing and matching with other beads and materials however you like. All of these are 3cm by 3cm and quite thin, with four corner holes, each hole 4mm in diameter for cord, thread or wire to be threaded through.

I'm really happy to see items bought from my shop be combined with other materials and used as part of your own jewellery or fashion designs to be sold at markets, online or offline, just be sure to leave me a photo or a message linking to it so I can see what you've done with them!

You may wish to modify the charms with paint or other treatments to add your own personal touch, or leave them in their natural state. Shapeways has a forum section dedicated to Post Production Techniques that you can check out for tips and ideas. Go wild, it's up to you! :)

Click here to check them out in the Shop!

Thursday, 2 February 2012

Making a Race Car Game in Unity3D

I've started work on a racing game to get myself to learn Blender, GIMP, and brush up on Unity3D. Here's the proposal document I wrote to myself:

Fancy looking document to help Developer Me persuade Publisher Me...

So far I've been following the Unity Car Tutorial for an "arcade-style race car set-up" and have gotten through section 1. I took it for a test drive and it definitely needs some tweaking, which is where the second section comes into it.

I'm not sure how I'm going to be able to make my own car after going through only this, so I'll have to have a look around to figure out what all different parts of the Car Game Object are meant to be.

EDIT: I found an even better tutorial for making a really basic car from scratch.

Friday, 30 December 2011

Glossy Buttons

I've been doing a spot of 2D texture work for a friend's game.


I've never done glossy before! It's quite exciting.

Monday, 1 August 2011

New Project: Chav City

A short while ago I asked my housemates to give me a game brief to work on. Here are some of the current details:

Chav City [working title] is a turn-based strategy game inspired by the Harry Brown film and a turn-based strategy game that I unfortunately don't remember the name of right now [should have written it down...].
There are three teams to choose from; the Chavs, the OAPs, and the Police, and there are three kinds of unit; Melee, Ranged, and Heavy.
Each team has a base [Council Estates, Retirement Home and Police Station], and the aim of the game is to take over an opponents base.


I'm pretty sure it would be easier to just make it as a board game, but the point of the project for me is just to see what it takes to make one of these kinds of games digitally.

~

I've learned a tiny bit of Blender by watching the videos here: http://www.blendercookie.com/getting-started-with-blender/ It feels a bit odd learning something from the start again, but it will be good once I know how to use Blender as well as Maya.

I've also just discovered that there is a new version of Unity3D or something, it's been that long since I opened the program last. Not sure yet what has changed, so I will have to find out in a bit.

Wednesday, 29 June 2011

A photo a day.

Well... the page-a-day didn't quite work out. I think the problem was that I got discouraged when I found I was having so many blank pages on days where I wasn't feeling in a particularly arty mood, and ended up losing track of the whole thing. Never mind, I still have the pages to doodle on when I want to.

Instead I've started a new 365 project. I take a photo of myself everyday for a month. And again the next month. And again and again until I make 12 months! But I don't just take a picture of my face like Noah did. Sometimes I edit them, practising and experimenting with digital tools to see what effects I can come up with and achieve.

Okay. I confess. It's partly an excuse to make pretty pictures of myself to put onto Facebook and to put into a book of my own for when I'm older or gone. A part of me wants to have lots and lots of sweeeet looking pictures, but I'm not a model... And I thought that since I'm not a model, then I shouldn't be taking or making pictures of myself and editing them like I wanted to put on display anywhere...

I think Alice Cat changed that belief. She wasn't a model. She was just a sweet looking little girl a couple years below me in school, and then a few years later, BAM! Now look at her. She's working away at a career she loves and she's looking pretty damn fine doing it. It's awesome. It's inspiring. It made me start taking a picture of myself everyday, and hopefully everyday for at least a year.

And sure, maybe I'm not doing it with a career in modelling in mind [or maybe I am.. I've never had a solid vision of a career path in mind], and maybe I missed one day and sneaked in a screenshot image of my sleep pattern diary, and maybe some of the photos are really lazy ones where I haven't even edited or colour corrected them, let alone tried to do anything arty.

But even the unedited ones still show something of who I was and where I was that particular day in the series. Not to mention how I really like how a few of them have turned out. If I can, I'd like to keep this up for the rest of my life. Join me! Feel free to post any links to your similar projects in the comments :)

Sunday, 12 June 2011

How NOT to stand out with your advertising.

Quickly went onto IndieDB today to accept an invite to join the group Flying Bones [the team name for our final major project], and lo and behold, what did I see?


I'm guessing those adverts on the edges are supposed to be in the background - but they're not and have ended up covering a fair portion of the screen's edges. I can't read any of the numbers on the side. I'm not amused. Especially since Ctrl scrolling doesn't do anything to help it.

I don't even know what they're advertising precisely, but already I've probably developed a subconscious link between it and the feeling of rage it's giving me. F.

Monday, 6 June 2011

Quick Prototype Development

Today I registered at IndieDB.

Then I read through this article by the people from the Experimental Gameplay Project on how to prototype games in 7 days.

... A very short post today.

Saturday, 4 June 2011

Hand in done, presentation on Tuesday!

Turned out pretty alright considering neither of us are supposed to be programmers. We changed a lot of the textures in the house to something a little more old-looking and realistic over the past couple of weeks. I've also managed to squeeze in a couple of extra levels for a bit more gameplay time. Here are a couple of in-game screen shots showing Tim's texturing and light mapping skills.

3D Mode

2D Mode

Fuck it, I'm in.

Okay. I know. I've ranted and raved and then gone back on my word and then gone back on it again about whether or not I wanted to make games. But after the challenges, the expected failures but also the surprise successes of working on this final project, I'm up for it. I have been extremely inspired by the success of Q.U.B.E., but I have no idea where I want what I will do to go. Probably into my collection of stuff I have done for myself.

Over the next month I'm going to work on the mechanics and the code we used in our final major project and make myself a new game. It won't be FP[3], but it will come out of that. It won't be all fancy and story and AAA style animations and look beautifully like real life. It will be extremely simplified, extremely basic, it will not try to be arty; it will just be a game. A tidy, efficient, well executed game. Maybe with some funky colours and a feel of abstractness about it. Maybe. Who cares. I'm in charge on this project and the only one grading it will be me.

Do I sound angry? I think I sound angry. I'm not angry... Just very, very determined to do what I want, and get what I want, when I want it.

... Although, I have also been listening to Queen's I Want It All all day, which may have something to do with it.

Friday, 6 May 2011

HubHouse: Make a house a Home.

I've added a few tables and chairs into the house now. It also got some interior walls and new different wallpaper colours over Easter. And a bit of grime. The bathroom now has a bath, but no sink or loo... very hygienic...


There is a magic teleportation device in one of the rooms aswell. It looks like a very strange and out of place cube.


...Okay, there isn't actually going to be a strange mysterious teleporting cube in the game. The cube is just the place holder for the code until we can get some magic paintings modelled and textured in there.

Wednesday, 20 April 2011

HubHouse: Changing Rooms

Got some fancy new wallpaper for the walls, coving and skirting boards, and a nice bit of board for the door...


Click on the images to get a better look at the wallpaper and grime.

HubHouse: Hole in the wall.

Bit more progress today, I've knocked through the wall, and UV mapped the house and given it a quick texture. Also been fiddling with lights, still looks a bit on the dingy side and what little light there is in the stairwell seems to be coming from out of nowhere...


Tuesday, 19 April 2011

HubHouse: Infinite Stairway

Here's the stairway the player begins in.


Access to the actual home part of the house: coming soon!

Monday, 18 April 2011

New house hub-area...

Here's what I've been working on today:


When I'm done, the player can try and try to get out, but they will always end up in the same place...

Sunday, 17 April 2011

FireBENCH!

This is a little something I made last night, for fun:


... I call it "FireBENCH!"


When you click, you fire benches that are on fire at the targets on the wall.*


... The targets are flammable.


Each time you click, the word, "Fire!" can just about be heard over the background music of a version of Firestarter that had Eric Cartman dubbed in as singing along to it.


* The targets' faces originally looked like a slightly modified version of the "troll face" that I've seen around the Internet, except with pink skin, brown hair added and an orange hoodie. I believe the picture was drawn by Frodey [or Frody?] in the year below me, but I hadn't asked to use it so I've got some more standard targets in for these screenshots. Also, I started feeling a bit creeped out by the fact that I had made this game when all those faces were looking at me, so I thought I'd better change it anyway...

Friday, 15 April 2011

Someone's vandalised the second room!

It has been a while since either of us have posted on this blog - apologies! Dissertations are out of the way now though, so we'll be able to focus our efforts on the project more :)

In the past month, "somebody" has vandalised room two.


They even put one on the outside of the room!


Meanwhile, I've been sat here at my laptop figuring out some javascript. I did manage to make the OrthoCamera [the 2D side view camera] move to the correct position depending on which room the player was in, but for some reason it kept forcing the view to change to it each time the new camera was created.

That wasn't supposed to happen, so after a chat with Mike Reddy [a Games & Artificial Intelligence lecturer] and Cody [? I think Rich said he went to UWN and graduated a few years ago?], I'm attempting to code this new script that tells the OrthoCamera to translate to the new position instead of destroying and re-instantiating it there...


I got quite stuck on Tuesday when I started doing this, but after watching a few Unity 3D Student videos, I think it's on its way again.

Wednesday, 16 March 2011

Yellow Snake

Today I made a little artwork to splat onto the walls of room two. Wasn't sure what to do though, so I'm drawing a little inspiration from my 4 Pillars [if you don't know what that means, don't worry. It's one of those Chinese Horoscope things].

Here's my year pillar, the Yellow Snake:


I literally just painted the body with the touch pad on my laptop, and sneaked a peek at this tutorial for some help with making it look like old graffiti.

Here's a quick look within Unity:

Empty Room; Requires Vandalism

This is a quick check I'm doing to see how the texture I've put on puzzle room two looks, before I start vandalising it with paint and more wear and tear like Tim has done for the first room.